Anaconda#
Anaconda is a distribution of Python and R for scientific computing that includes the conda package manager system which aids with reproducibility. You can read more about Anaconda on their website.
Tip
Anaconda is our actively supported Python distribution on both ARC3 and ARC4. For best performance, we recommend exploring using it within a container
Usage#
To access the anaconda module use the command:
$ module load anaconda
This will make available the Conda package management tool, but it will not load any environment. You may wish to load and use the base environment which has the default Python 3.7.4 and the Python packages made available in the Anaconda 2019.10 release.
To enter the base environment:
$ source activate base
This will adjust your prompt and add a prefix with the environments name surrounded by parentheses e.g. (base).
You can see the packages and versions available in the base environment:
$ conda list
You can exit an environment after use:
$ conda deactivate
To delete an environment (and all associated files) you no longer need:
$ conda remove --name my_env --all
To view all available environments:
$ conda env list
Note
We recommend, however, that you do not use the base environment but create and activate custom environments built to the specifications you need for your projects.
What is a conda environment?#
Conda environments are a form of python virtual environments, a self contained directory that contains a particular version of python plus a number of specific python packages. Conda allows us to create and manage several of these separate environments at the same time.
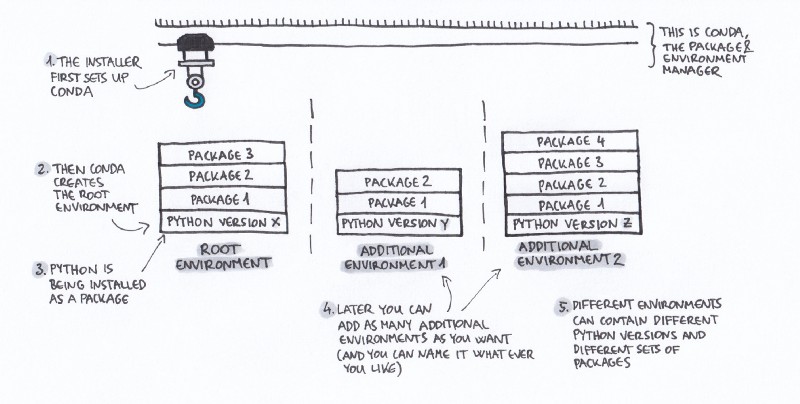 Image Copyright © geohackweek
Each environments packages and installed python versions are isolated from one another preventing notorious package ‘dependency hell’ situations. Conda also allows us to share environment specifications through the creation of simple text files, aiding reproducibility.
Creating custom environments#
To create a new Python 3 environment with the Pandas, Numpy and Scipy libraries named example_env_1, use the command:
$ conda create --name example_env_1 python=3 numpy scipy pandas
Here we have used the conda create command, we specify a name for our environment using the --name/-n option and then the packages we want to be installed, and if we require specific versions we include that in the pattern <package>=<versionNumber>.
You’ll note that during the installation process that Conda will attempt to install the enviroment and it’s constituent packages in your home directory:
## Package Plan ##

environment location: /home/home02/issev001/.conda/envs/example_env_1

To load this environment:

source activate example_env_1

and to deactivate it after use:

conda deactivate
At any time, you can list your Conda environments (whether in your home directory or elsewhere):
$ conda env list
First time .conda setup#
By default conda stores files relating to environments in the .conda directory which lives in your home directory. This .conda directory can often get quite large with all the different packages installed for different environments which can fill up a users home directory quota.
To avoid this you can use the following steps to move your .conda directory to your /nobackup directory instead.
$ cd ~

# delete symlink, if already present
$ rm -f .conda

# create these directories if they don't already exist
$ mkdir -p .conda /nobackup/$USER

# move the .conda directory to your nobackup directory (here represented as $USER)
$ mv ~/.conda /nobackup/$USER/

# create a symlink between your .conda directory you've just moved
# back into your home directory
$ ln -s /nobackup/$USER/.conda ~/.conda
For the full conda documentation please consult their website.
Conda channels#
Conda provides packages via channels. Channels are hosted locations where packages are sorted and maintained. Packages you install are downloaded from these remote channels which are URLs to directories containing conda packages. The conda command searches the channels you have configured for the packages you have requested and by default it searches the anaconda channel.
You can specify a channel to use in your conda install command using the --channel/-c option, for instance:
$ conda install -c conda-forge r
This install command will install the R language using the conda-forge channel.
You can also add channels to your conda configuration, so they are always searched whenever you attempt to install packages.
# in this example adding the bioconda channel
$ conda config --add channels bioconda
Installing packages that depend on CUDA#
There’s a virtual package called “cuda” that is autodiscovered from the running system, to allow Conda to match installed packages to the current system. When you’re building an environment, you will often be doing this on a machine without the GPU you’re planning on using at runtime. This can be overridden in the recipe:
CONDA_OVERRIDE_CUDA=12.0 conda create --name example_env_1 conda-forge::tensorflow=2.15.0
You can check at the conda-forge website that the version of the package and the CUDA version is actually available. At the time of writing, 12.0 is currently supported on the P100 cards on ARC3, and the V100 cards on ARC4.
Example conda environments#
Below we cover some examples of more generic conda environments HPC users might wish to create depending on their research.
Creating a Python 2 environment#
Whilst Python 2 is no longer supported by the Python Software Foundation we occasionally come across code that still requires Python 2.
You can use conda to create a specific python 2.7 environment with the example below:
$ conda create -n project2 python=2.7
Creating an R environment#
Although Conda was originally designed to manage Python, it’s just as happy dealing with R. If you need to have multiple different versions of R available for testing purposes you can create separate R environments for each one.
Note
The r conda channel currently only has R versions up to 3.6.1. For more recent versions please see below for installing R using the conda-forge channel.
# this will use the r conda channel
$ conda create -n r_env r-base r-essentials
You are able to install R packages directly through conda rather than using CRAN. However, not all R packages on CRAN are available on conda and so you will need to be aware of this when configuring your environment. You are still able to install CRAN packages into conda-installed R and it will install these R packages within your conda environment.
Installing R with conda-forge#
If you wish to use R versions later than 3.6.1 you will need to use the conda-forge channel for installing R.
For example installing R 4.0.3:
# create a conda environment in which we install R 4.0.3 from the conda forge channel
$ conda create -n r403 -c conda-forge r-base=4.0.3